How Do Hoverboards Work: Self-balancing Technology

How do Hoverboards Work

Have you ever wondered about how hoverboards work? I know you did if you know what we are talking about here. However, if you don’t then let me give you a quick idea about what a hoverboard is. It’s a two-wheeled electric ride where the balance is maintained between the front and back end of the ride, unlike bikes (in bikes side to side balance is maintained). The actual name of this ride is “Self-balancing Scooter” but as “Hoverboard” sounds pretty cool so people call it by that.

Now I’m not gonna lie to you. The first time I saw hoverboards, what popped in my mind is how this thing maintains the balance. Come on it’s not like a bike where the rider maintains the balance. It’s the technology here which does it! Brace yourself there because I’m gonna explain this now.

The Magic Balance

Balance

A couple of hoverboard components come at play when it comes to the balancing part. To get a hold of it first we need to recap some of the high school science.

Center of Gravity

I’m not gonna be the school teacher here. So I’ll not talk about all those stuff from the science book. Let’s get it through by an easy example. If I ask you to lift a log and put it in your shoulder, which part of the log should you put in the shoulder? Yeah, I’m sure you’ll put the middle one. But, do you know why? Well surely it’s because the center of gravity is in the middle of the log, hence it’s easy to carry it through that point.

To simply put the center of gravity of an object is the point where the weight is evenly distributed around. Every single thing that has weight also has a center of gravity. Similarly we humans also do have this and amazingly it’s not fixed. It changes with body movement.

So when you are on a hoverboard your center of gravity is there. You lean forward or backward and the center of gravity changes. Hoverboards have this technology to detect this and counteract this so that you don’t topple over.

How Hoverboards Work to Counteract the Center of Gravity

There are two components in the hoverboard which have particularly this job to detect your center of gravity. One is the tilt sensor and the other is the gyroscope.

Tilt Sensor

Tilt Sensor
Image Source: https://commons.wikimedia.org/wiki/File:Digital_Tilt_Sensor_Forceup_HDR.jpg

A tilt sensor is as it sounds, it senses how much the tilt is. You might think that this is somewhat new technology, but actually, it isn’t. In the early days, big fat mechanical tilt sensors were used, but now this has developed into compact electrical tilt sensors like in the picture above. Relax there, I’m not gonna dig deep into this.

Gyroscope

Gyroscope
Image Source: https://commons.wikimedia.org/wiki/File:3D_Gyroscope.png

The gyroscope sounds like a “mad scientist” stuff. Well truthfully if you wanna know the working principle of it, then I’m gonna bail out too! The physics behind it is not complex though, but you have to get to know a couple of physics theories & formulas. I’m sure you don’t want it here. Rather I’m gonna talk about why a gyroscope is required in stuff.

To simply put gyroscope lets you know about the orientation of the device you put it in. Let’s talk about gyroscope in cell phones. It’ll help you to get this easily. Almost everybody using a smartphone has played games controlled by the screen orientation. Now how do you think your phone detects in which way you are holding your phone. Yes, it’s a gyroscope that does it.

Gyroscopes are one of the major components behind the self-balancing technology of a hoverboard. I suppose you already get the point that hoverboard gyroscopes are there to detect your orientation or maybe your inclination on the ride. This gyroscope data gets processed by the brain (the main processing board) of the hoverboard and results in enough torque in a particular direction so that you remain balanced.

Only the Balancing is not all!

Apart from balancing the hoverboard, there are some other parts at play for hoverboards to work. And those are not too complex to work with. I know you can name them as well, like wheels, batteries and etc. Let’s get through them quickly.

The Frame

Hoverboard Frame

All the hoverboard parts need to be put into something right? Yes, that something is the frame. However, this frame needs to be centrally pivotal. Meaning right or left ends of the frame should able to move around each other. Now this frame could be made of steel or sturdy plastic even. No harm in either. In fact, any light but strong enough frame should be preferable. Because the heavier the frame is the more weight the hoverboard needs to carry.

Wheels with an Electric Motor

Hoverboard Wheel

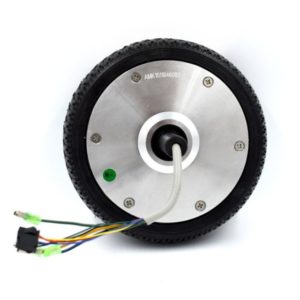
Obviously, there are two wheels but amazingly there are two different motors within each of the wheels. Most importantly these wheels can run independently by the rider, one by the right foot and other by the left.

Battery for Power

There are two battery packs in the hoverboard, each for one of the electric motors, sits beside each of the wheels. Usually, these are lithium ion 36V 4400mAH batteries. The battery type can deliver moderate power in less frequent charging. Check our blog on safe batteries for hoverboards to learn more.

The Brain (Logic Board)

Hoverboard Logic Board

All these parts need to be controlled by someone in the hoverboard right? Well, the mastermind is the logic board or motherboard. All the parts feed their data to this board & it controls the motors as it programmed to do. Now the better the brain is the better your hoverboard will behave, meaning reputable hoverboards use robust programming in the logic board.

How all of them in Hoverboards Work Along?

I suppose you know how people ride a hoverboard and if you don’t then no need to worry, check our “How to ride” blog on this. Anyway, when the rider steps on a hoverboard, both the tilt sensors & the gyroscopes start working. The tilt sensors sense if you are inclining forward or backward and the gyroscopes detect the center of gravity of you. All these data are sent to the mainboard and gets processed instantly. As a result, the mainboard instructs the electric motors to rotate the wheels in a particular direction and at a particular speed.

Now to keep a self-balance the mainboard holds a safe range center of gravity by automatically speeding up or slowing down the hoverboard. To get a hold onto the top-performing hoverboards check our Top 10 Hoverboard Reviews.

Don’t forget that this entire thing is an ongoing procedure. Meaning as long as the rider rides it, all the components keep working & the main board keeps processing.

Still curious about how hoverboards work? Check out the awesome teardown video from Fictiv folks below!

Are Hoverboards Safe: How Safe They Really Are?

Are Hoverboards Safe

Hoverboards made their entry in the market during the early 2015s. In a short time, it became booming popular with inspiration from the celebrities and media. Come-on let’s embrace the fact that it’s actually a cool thing to have. Moreover, it was a new technology then, quite easy to ride and somewhat trendy. In short, hoverboards started selling like a hotcake.

But soon this booming trend was slammed by some safety incidents relating the hoverboards. Seemed like it was prone to catch fire randomly out of the blue. Therefore, the authorities stepped in and things like banning hoverboards, recalling faulty products and setting standards took place. So all this raised a big question, are hoverboards safe?

What Was Wrong With The Hoverboards

Now before continuing this let’s have a crash course on why the hoverboards caught fire. I’m sure you know that hoverboards are an electrical ride and have batteries in it. Batteries mean moderately big batteries. It’s bigger than the one you have in your cell phone or laptop but smaller than the one you have in your car.

There are mainly two types of batteries in our daily life products. One is lead acid, the classic fat one and another is lithium ion, the modern sleek one. For instance, lead-acid is the fat battery in your car sitting under the hood. Whereas lithium ions are everywhere now, starting from your cell phone, laptop to electric cars. Lithium ions are far more efficient than lead acid batteries and I’m sure you don’t want me to discuss it here why.

Lithium-ion Batteries

Now let’s talk about why the lithium-ion batteries catch fire. Well truth to be said the ones that catch fire is a design flaw or manufacturing flaw, it’s not a technical flaw. However, not all such batteries catch fire. You are having it in your cell phone, laptop, and a lot of other devices. Not all catch fire out of the sudden, right? But few out of the many do as well and you might not hear them about. If you remember one popular Samsung phone was recalled due to its battery explosion. I’m sure some similar incident happened with some laptops or other devices as well which didn’t come to the limelight.

Elementary science says in a battery there should be a positive terminal and a negative terminal. These terminals are well separated by a separator in the battery. You connect your device to those terminals to power things up. But if somehow the terminals get connected beneath the battery (short circuit) then it heats up and eventually ends up in fire or explosion. Now the question arises how a short circuit could happen within a battery. Simply put if the terminal separators wore off or there is a breach then there is a short circuit and you know the rest. Some cheap manufacturers cut corners and use poor quality separators. Their batteries are the one which is prone to accident.

Hoverboard Battery

Enough geek talk on batteries. Now let’s get back on how to make hoverboards safe.

Safe Riding

Every wheeled ride has some risk associated with it. You ride a bike or a skateboard or anything similar you are risking yourself of falling off and hurting yourself. Hoverboards are no different here. You could get bruises, strains, sprains, and even fractures from riding it. There are some preventive measurements you could take. Don’t miss to check our blog on that. Surprisingly these measurements are exactly those which you would take when you ride a bike, skate or skateboard. Yes I know I don’t need to tell you about this. But no harm in going through them again right?

  • Use protective gear like helmets, wrist guards, elbow pads & knee pads.
  • Follow manufacturer safety guidelines properly. Like age or weight restrictions and other warnings.
  • One best thing to do is riding in a safe zone avoiding traffic. Come on its common sense. No one will ride something in a freeway, right? I know you get my point.
  • Don’t over speed just because the thing allows you to.

Safe Hoverboards

Here comes the safety of the hoverboard itself. You would know better if you have an idea of how it works. We already talked about why hoverboards catch fire and not be safe. It’s time to get on what to do about it and how to prevent it. It’s quite obvious now that cheap hoverboards are more prone to fire. So it’s good to avoid the cheap ones & get one from reputable manufacturers. You may check our Top 10 Reviews to get an idea. But still just getting a reputable hoverboard from a reputable store is not a good enough safety check, is it? There are some other safety checks you need to make.

The Plug

A cheap hoverboard is most likely to be equipped with a counterfeit plug compromising safety. You might need to check it for:

  • A BSI (British Standard Institution) certified marking in the plug body.
  • A small fuse within the plug.
Hoverboard Plug
Image Source: https://en.wikipedia.org/wiki/File:Bs1363-plug.jpg

You can check the details of how to identify a counterfeit unsafe plug here in bsigroup.com.

Packaging

Most of the cheap low-quality hoverboards have weird packaging. You’ll see a brand name or specific manufacturer name label is missing there. Besides misspellings will be there in the package, product itself or the user manual. Look out for this when you pick one.

CE Marking

A certification mark which I’m sure you are familiar with. A lot of devices are out there which have this marking ensuring the CE standard. The CE check stands for the reliability of your hoverboard. Cheap ones will have no CE marking or something which doesn’t match with the real one.

CE Mark

UL (Underwriter Laboratories) Certification

As I said earlier, after the fire incidences in the early hoverboard days, authorities stepped in. So finally in February 2016 UL2272 certification was set specially for hoverboards. Thanks to the UL guys to help out all the hoverboard fans out there. Moreover, the good news is UL2272 certification complies with the U.S. Consumer Product Safety Commission (CPSC) as well!

UL2272 certified hoverboards had to go through more than 100 severe tests to get this. These tests include the complete electrical system test including tests for battery safety.

So the bottom line is hoverboards that are UL2272 certified, are free from any electrical fire risk and thus are safe.

Now it’s obvious now that UL uncertified hoverboards possess a fire risk and you know what to do and what not to!

Charging

Yes, you are wrong if you are thinking a certification is there and you don’t need to be cautious anymore. Every lithium-ion device advises to use the supplied charger, discharge the battery time to time and not to overcharge it. The same applies to our hoverboards here.

  • Always use the supplied charger & avoid using any other chargers, even if it appears to charge the hoverboard. You never know what damage you are causing in the long run.
  • Don’t overcharge it. A big mistake is putting in charge for a longer time than it is required.
  • Try to charge your hoverboard only when it’s discharged or in a low battery. That way you can keep the battery healthy.
  • Make sure your batteries don’t get any physical shock. Usually, this comes from dropping the hoverboard or a hard hit.

Final Words

Unsafe hoverboards are long gone and It’s quite safe now. People around you are having it, riding it and most importantly enjoying it. But still being cautious never can harm you right? Rather you might get the advantage of it someday.

How to Ride a Hoverboard: 4 Steps Easy Learning

How to Ride A Hoverboard

Hoverboards have been gathering momentum since early 2016 as a smart means of urban transport. However, don’t be fooled by the name – while the word hoverboard may conjure images of futuristic sci-fi cities where people zip around on boards hovering just off the ground – what we mean by hoverboard is actually an electric self-balancing scooter.

Hoverboards have been growing in popularity and with that comes the question of how to ride one and how it works. Well, truthfully it does require some learning like every other ride which involves some balancing manoeuvre. But don’t let that put you off, as it is simple to pick up and doesn’t take long to before you start feeling comfortable cruising the sidewalk. Kids aged from about 7 years old can safely learn how to ride a hoverboard. Check out our Kids Hoverboard Reviews for the low-down on choosing the right hoverboard for your child.

But first, before you jump on your hoverboard for the first time, we recommend equipping yourself and your kids with appropriate protective gear to ensure safety while riding. A helmet is most vital, and getting wrist guards, elbow pads & knee pads is also recommended for beginners. You might like to check out our blog on Safe Hoverboards. Last but not least don’t forget to follow the safe riding basics as outlined by Steve below.

Golden Rules

Now let’s get started. But first there are two golden rules for beginners to remember.

  • Don’t bend from the waist on the hoverboard (tilt forward from the ankles instead)
  • Always ride on a flat surface (must avoid uphill and downhill)

Pre-Ride Checklist

In addition to the above, you need to keep in mind some basic tips to ensure each ride is enjoyable. We know you’re keen to get on with riding and zipping around like a pro, but it pays to use common sense and give some thought to the following.

  • Always ride in a zone where you are legally allowed to.
  • Before taking to the streets practice somewhere which is safe for you and the people around you as well.
  • Make sure your hoverboard holds enough charge before setting out. We know there’s nothing worse than having the battery die out in the middle of your ride.
  • If your board has a beginner mode, enable that option. This will limit your maximum speed when learning to ride.

Riding Guide: 4 Easy Steps

Hoverboard riding is an evergreen skill, once you get the hang of it, it’s just like riding a bike. There are 4 easy steps when learning how to ride a hoverboard.

1. Stepping On

This is a very crucial step and in my opinion the shakiest thing to do for first-timers. It can seem unnatural at first and it’s easy to picture yourself falling off. But follow our lead here and be assured you can do it.

Try to get support from something sturdy like a wall or fence when you are first getting on. Hold on to the support and step on the hoverboard with your dominant foot. Try to start shifting your weight there. You’ll notice the board begins to start moving straight away. But you are holding on the support right, so don’t let it move just yet.

Try to take it slow here. Play with it a bit and you’ll get the idea of balancing.

Once you are done put your second foot on the hoverboard and let the support go slowly. In some hoverboards there is an indicator that will show when to step the second foot. It actually senses your first foot position and if it’s good then it’ll give you a green signal for the second. Practice this entire thing a couple of times to get familiar with it.

2. Getting Off

Getting Off

now you know how to get on, getting off a hoverboard is not a big deal. If you can get on fine, then getting off is exactly the reverse process. However, beginners need to keep something in mind. Never try to get off by stepping forward. In that case, hoverboard will keep moving forward, and most likely you’ll face plant. So you need to get off by stepping back. Ensure the board has stopped moving, step off with your dominant foot, and then quickly follow with your second foot.

3. Moving Around

Now that you’ve nailed stepping on and off, it’s time to master moving around.

But first, you need to get to know your hoverboard motors. There are two motors, one for each wheel. As you lean forward and shift your weight into the balls of your feet, that will make the motors run forward. If you lean back slightly and shift the weight into the heels, the hoverboard will reverse. As I mentioned earlier don’t bend at the waist, instead tilt more from your ankles, like hitting the gas in a car. Take it slow and you’ll see you are moving in no time.

So moving around is just a mixture of your footwork.

4. Turning the Hoverboard

Now that you’ve mastered moving forward and backwards, it’s time to add some gentle turns.

To turn, exert some slight forwards and downwards pressure into the toe of the foot on the opposite side of the direction you want to turn. So to turn left, send some pressure into the toes of the right foot, and notice you begin to turn left. The more you lean into it, the more you will turn. If you want to get tricky with it, you can try adding in some pressure with the heel of the other foot, which will result in a sharper turn. With practice, you will eventually be able to use this technique to master 180 and 360 degree turns.

Hoverboard Turning

If one of the wheels rotates faster than the other then it’ll turn in the slower wheel side. Now guess what’ll happen if the wheels rotate in the opposite direction (one forward and the other back), it’ll make a sharp turn even a 360 rotation is possible.

Tips and Tricks

Let’s round this out with some final tips to help you on your way.

  1. Make sure your hoverboard is fully charged before use. If in the middle of a ride your hoverboard dies then you might need to carry it for the rest. Not much fun, and definitely a problem if it happens to one of the kids. Hoverboards are quite heavy and cannot be carried for a long time, especially by kids.
  2. If you ride your self-balancing scooter for a daily commute, road bumps may be unavoidable. The secret is to pass over bumps in a diagonal direction, allowing one wheel to meet the bump first and then the other. In this way, you can easily take on road bumps on your hoverboard.
  3. Hoverboards don’t make much sound. So when riding among pedestrians, sound a bell or play music to let others know you are coming so that no one gets hurt.
  4. Speeding will surely give you some joy but with associated risk. So just use your common sense here.
  5. It’s a battery powered device. So follow the manufacturer’s instructions strictly about charging & discharging events to keep it safe and ensure it lasts as long as possible.
  6. Have fun! Hoverboards are a supremely fun way to get outdoors and explore your local area and new neighbourhoods. I highly reccommend you give it a go.